How to Integrate Incogniton with ProxyEmpire
⬇️ Experience our high-end residential proxies for just $1.97
Incogniton is an anti-detect browser that lets you create separate browser profiles with unique fingerprints, cookies, and proxy settings.
By connecting ProxyEmpire proxies with Incogniton, you can assign each browser profile its own IP address and location. This is useful for account management, market research, ad verification, localized browsing, and other multi-profile workflows.
In this guide, we’ll show you how to set up ProxyEmpire proxies in Incogniton.
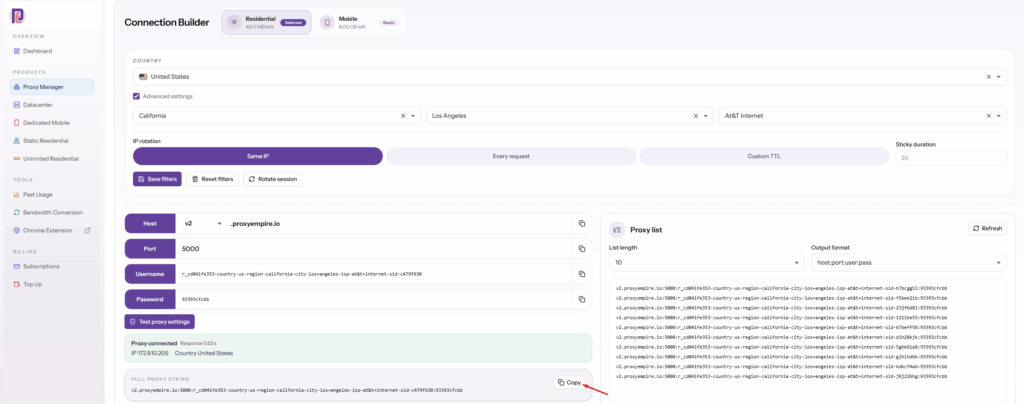
Step 1: Get Your ProxyEmpire Proxy Details
Log in to your ProxyEmpire dashboard and generate the proxy you want to use.
You can use:
- Residential Proxies
- Mobile Proxies
- Static Residential Proxies
- Datacenter Proxies
Select your preferred proxy type, location, and session settings.
For logged-in accounts, sticky sessions are usually the better option because the profile keeps the same IP for longer.
Once your proxy is generated, copy these details:
- Host
- Port
- Username
- Password
ProxyEmpire proxies work with the same host, port, username, and password on both HTTP and SOCKS5. You do not need separate details for each protocol.
Step 2: Create a New Profile in Incogniton
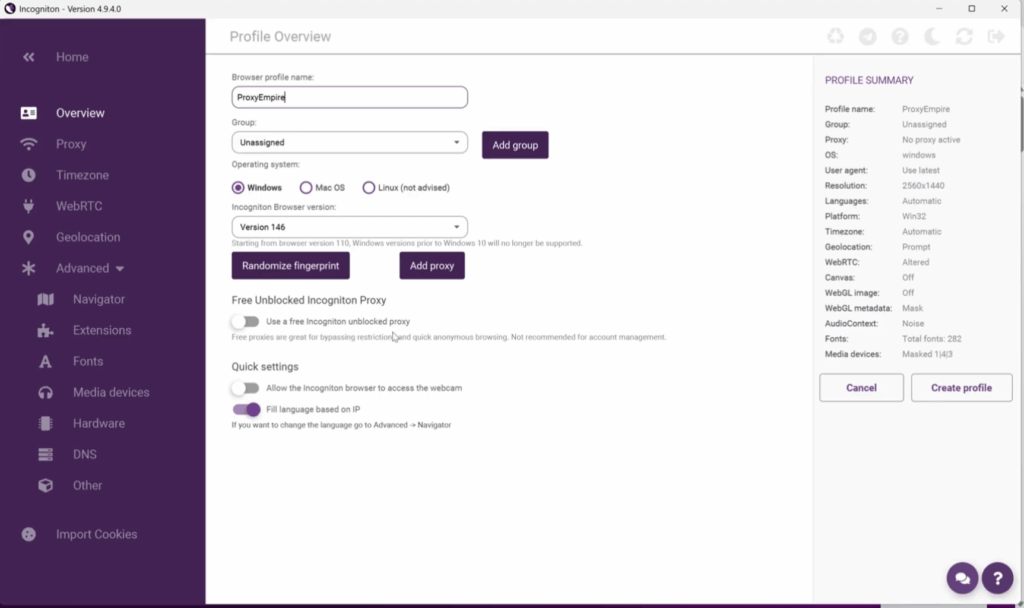
Open Incogniton and create a new browser profile.
Give the profile a clear name, such as:
- US Residential Profile
- UK Mobile Profile
- Germany Static Residential Profile
Then configure the basic browser profile settings.
For best results, match the profile settings with your proxy location. For example, if you are using a US proxy, use a US time zone, US language settings, and matching geolocation settings.
Step 3: Add Your ProxyEmpire Proxy
Inside the Incogniton profile settings, open the proxy section.
Enter your ProxyEmpire details:
| ProxyEmpire Detail | Incogniton Field |
|---|---|
| Host | Proxy host / IP |
| Port | Port |
| Username | Username |
| Password | Password |
| HTTP or SOCKS5 | Proxy type |
Select either HTTP or SOCKS5 inside Incogniton.
Then paste the same ProxyEmpire host, port, username, and password.
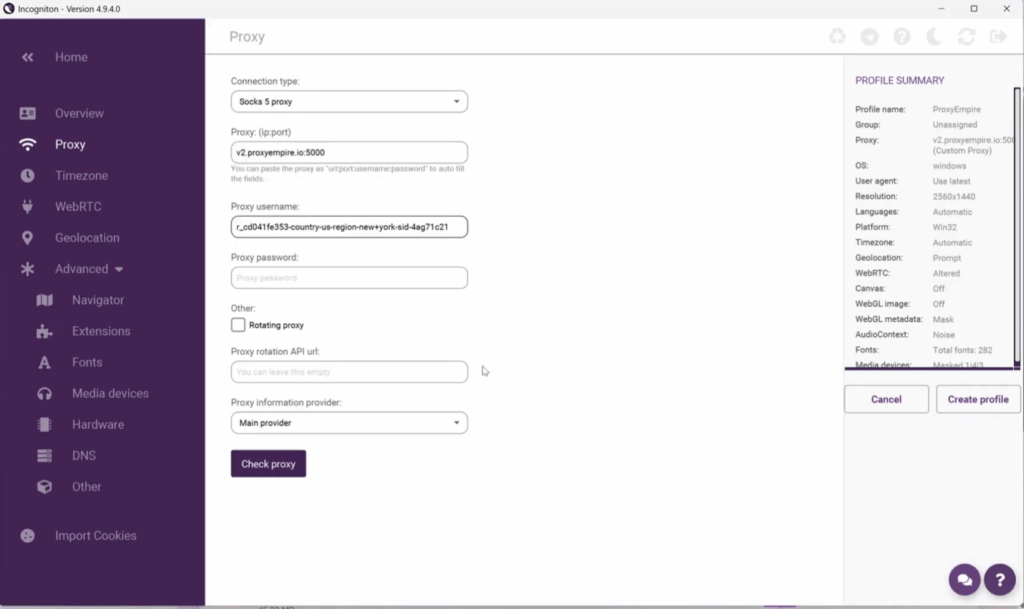
Step 4: Check and Save the Proxy
Click the proxy check button inside Incogniton.
If the details are correct, Incogniton will confirm that the proxy is working.
Make sure the detected IP location matches the location you selected in ProxyEmpire.
Once the proxy test is successful, save the profile.
Step 5: Launch the Profile
Return to your Incogniton profile dashboard and launch the browser profile.
Your Incogniton profile will now run through your ProxyEmpire proxy.
You can confirm the setup by opening an IP checker website inside the profile and checking that the IP address and country match your ProxyEmpire proxy settings.
Best Proxy Types for Incogniton
Residential Proxies
Best for general account management, localized browsing, ad verification, and market research.
Mobile Proxies
Best for mobile-first platforms, social media workflows, and carrier-based browsing.
Static Residential Proxies
Best when you need the same IP for longer sessions.
Datacenter Proxies
Best for faster, lower-cost tasks where residential IP quality is not required.
Incogniton Exclusive Discount Code for ProxyEmpire Users
You can use the discount code “ProxyEmpire” for a 20% recurring discount on any Incogniton plan.
Conclusion
Setting up ProxyEmpire with Incogniton is simple.
Generate your proxy in ProxyEmpire, copy the host, port, username, and password, then add those details to your Incogniton profile. Select HTTP or SOCKS5, check the connection, save the profile, and launch it.
Your Incogniton browser profile will now use your selected ProxyEmpire proxy location.