The easiest way to configure proxies in Google Chrome is with the free ProxyEmpire Proxy Manager plugin for the Chrome browser.
It supports both HTTP and SOCKS5 proxies with or without user and password authentication. You can use it with proxies from any provider, and it supports bulk proxy import, as well as giving you the option to manage your different proxy profiles.
Privacy and security should be one of the most important factors of operation for individuals and corporations alike. The truth is every single day millions of entities are leaving trails of their identity throughout the Internet by exposing their static or dynamic IP addresses.
Chrome proxy settings enable a user to thwart the dangers that one can encounter from leaving their network exposed to unsavory cyber characters.
In this blog post, we will go over how to use your Chrome proxy settings properly and how proxies can be leveraged to secure your business interests. If you’re using Firefox instead of Chrome, be sure to check out our guide on Firefox proxy settings.
If you need reliable high speed proxies, ProxyEmpire offers 9.5 million residential proxies with advanced filtering, targeting options, unlimited connections, and rollover data for seamless web scraping and data gathering.
The Real Risk of Not Using A Chrome Proxy
By default, web browsers like Chrome use your network directly from the router and your place of business or home. Residential addresses are assigned a dynamic IP address from Internet service providers. Dynamic is just a fancy term for an IP address that can change over time.
Businesses with a commercial Internet service provider aren’t assigned static IP addresses. This simply means that, unlike dynamic residential IP addresses, static commercial IP addresses never change.
What does this mean for you?
Whenever you go online or one of your staff members it exposes your true IP address which reveals your location and other sensitive information about your organization. Ad companies use this data to target your purchases and serve you tailored media.
Why Configuring Chrome Proxy Settings Can Help…
A proxy is a mask or a partition if you will between you and the platforms you’re visiting. When you use a proxy all of your Internet requests filter through it. This means that the world sees you as the proxy instead of your true identity which lies behind it.
Traditional proxies from data centers will tip off the host you visit that you’re masking your connection and they also limit what locations you can appear from.
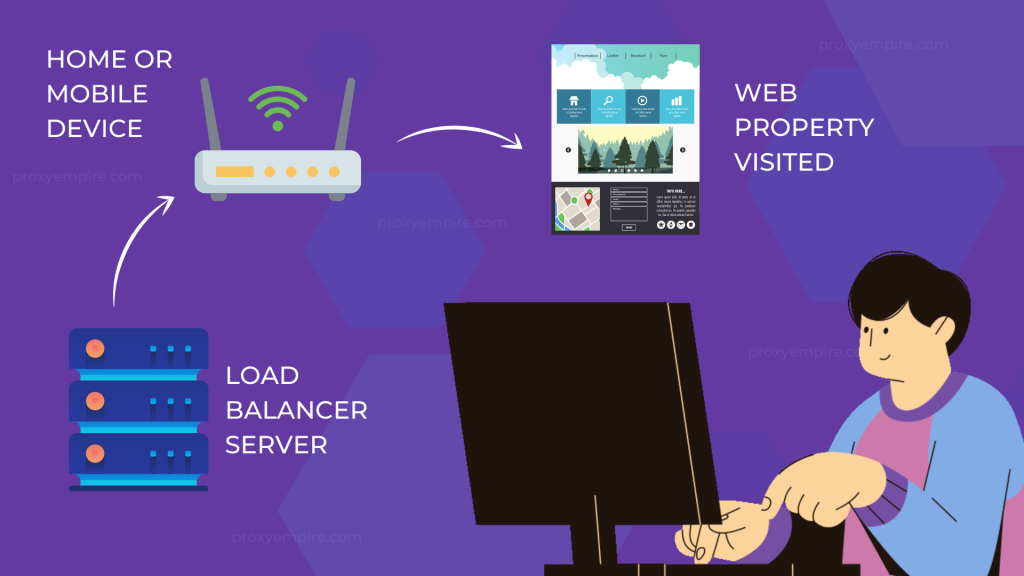
That’s the added benefit of using residential and rotating mobile proxies.
These types of proxies are sourced legally through third-party contracts, and they give access to people’s network connections. You then leverage their residential or mobile IP address as a mask. This makes you look like you’re browsing the Internet or making requests from a legitimate location.
How To Configure Chrome Proxy Settings
Chrome comes with an intuitive way of adding a residential or mobile proxy to the browser which will facilitate incoming and outgoing connection requests. Remember, setting up your proxy and Chrome means that the connection will only use the proxy within Chrome.
Now let’s set up your Chrome proxy settings to work with your new proxy.
Step 1: Open The Hamburger Icon And Click Settings
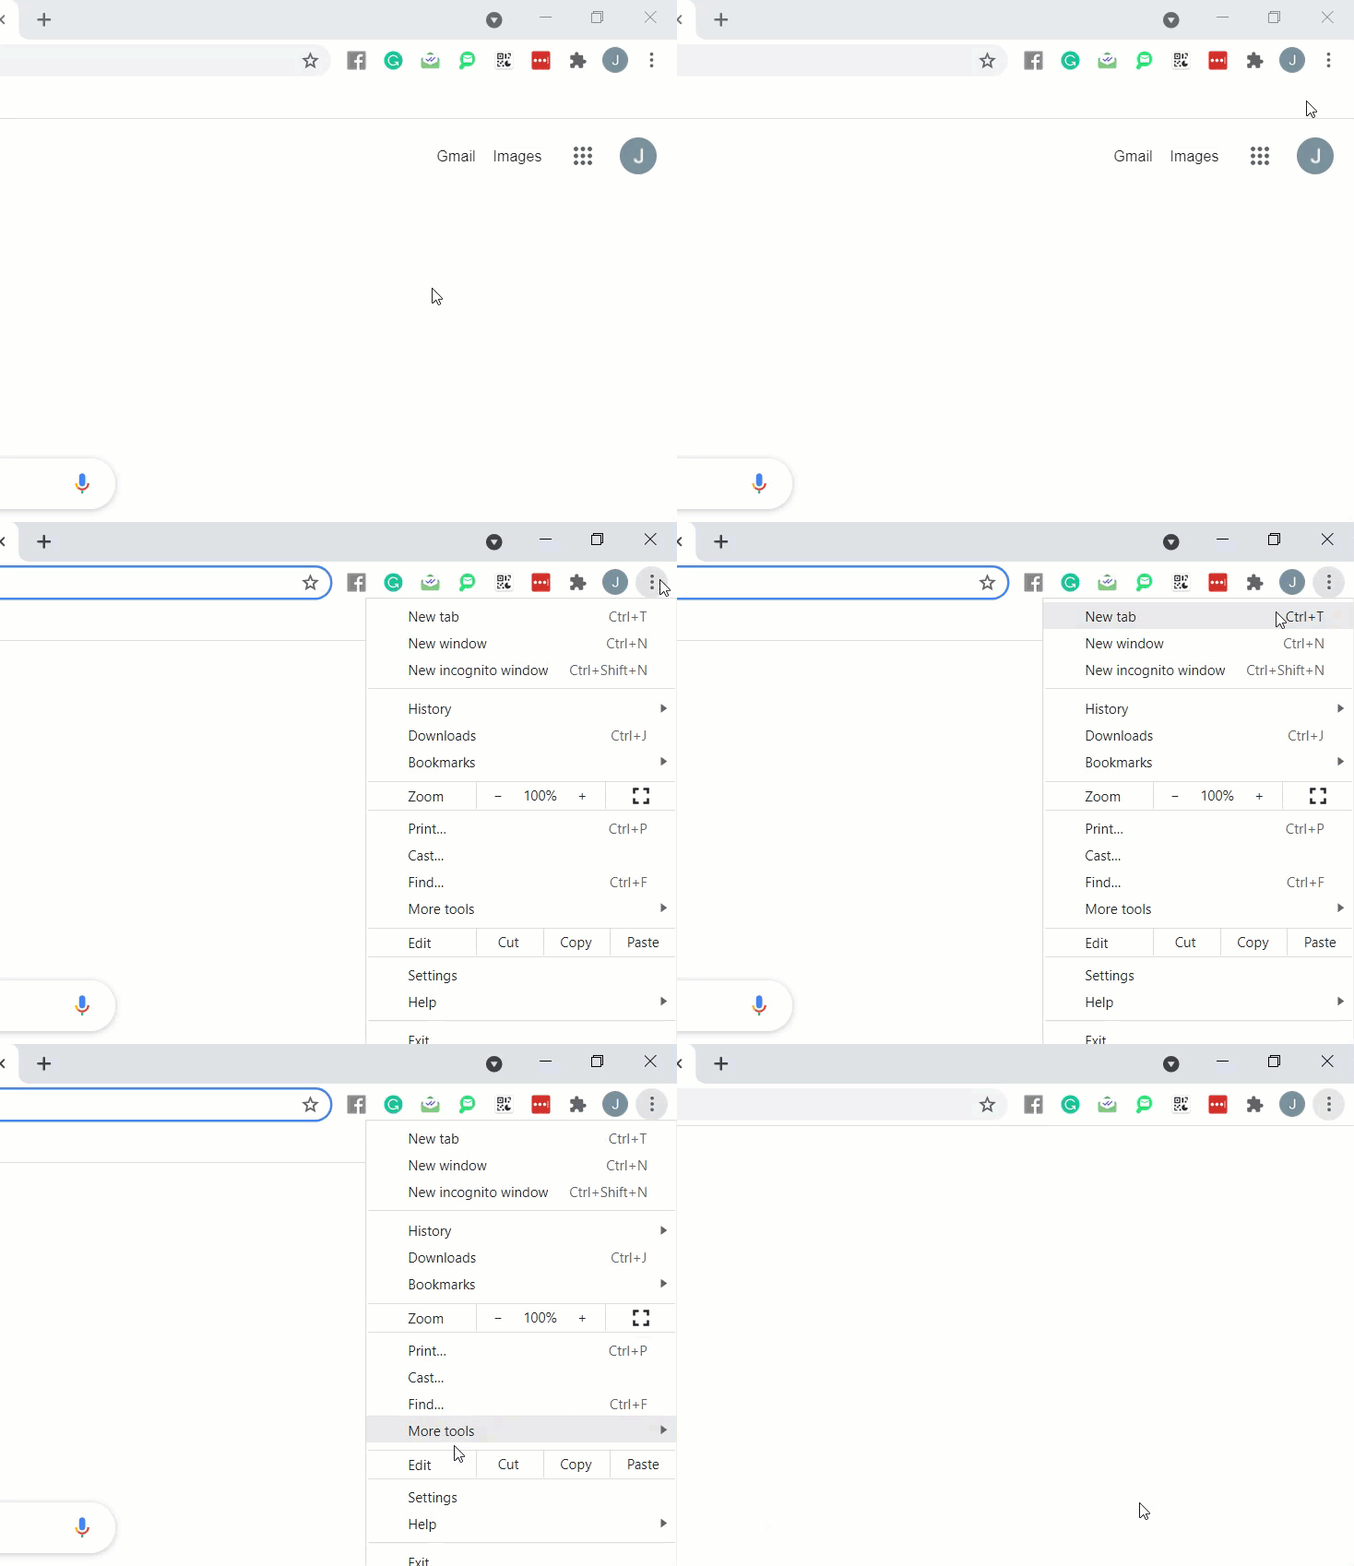
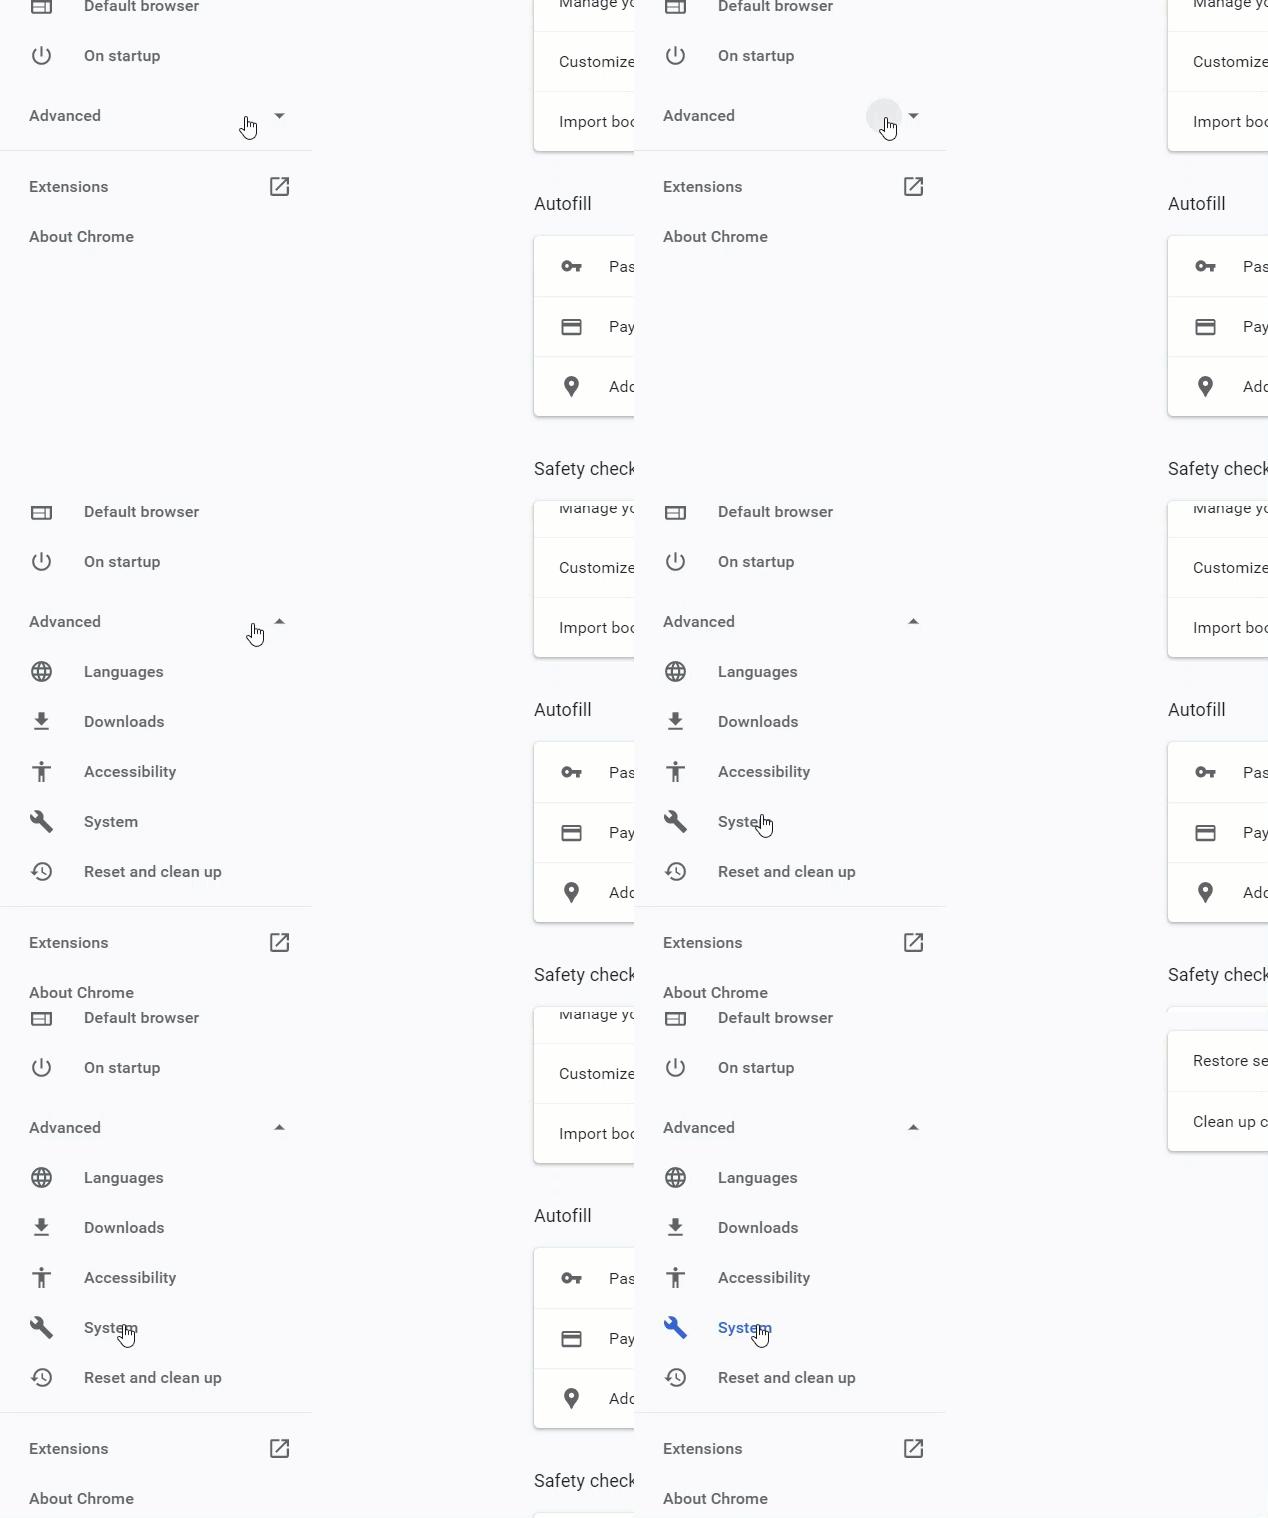
Step 2: Find Advanced And Click On System
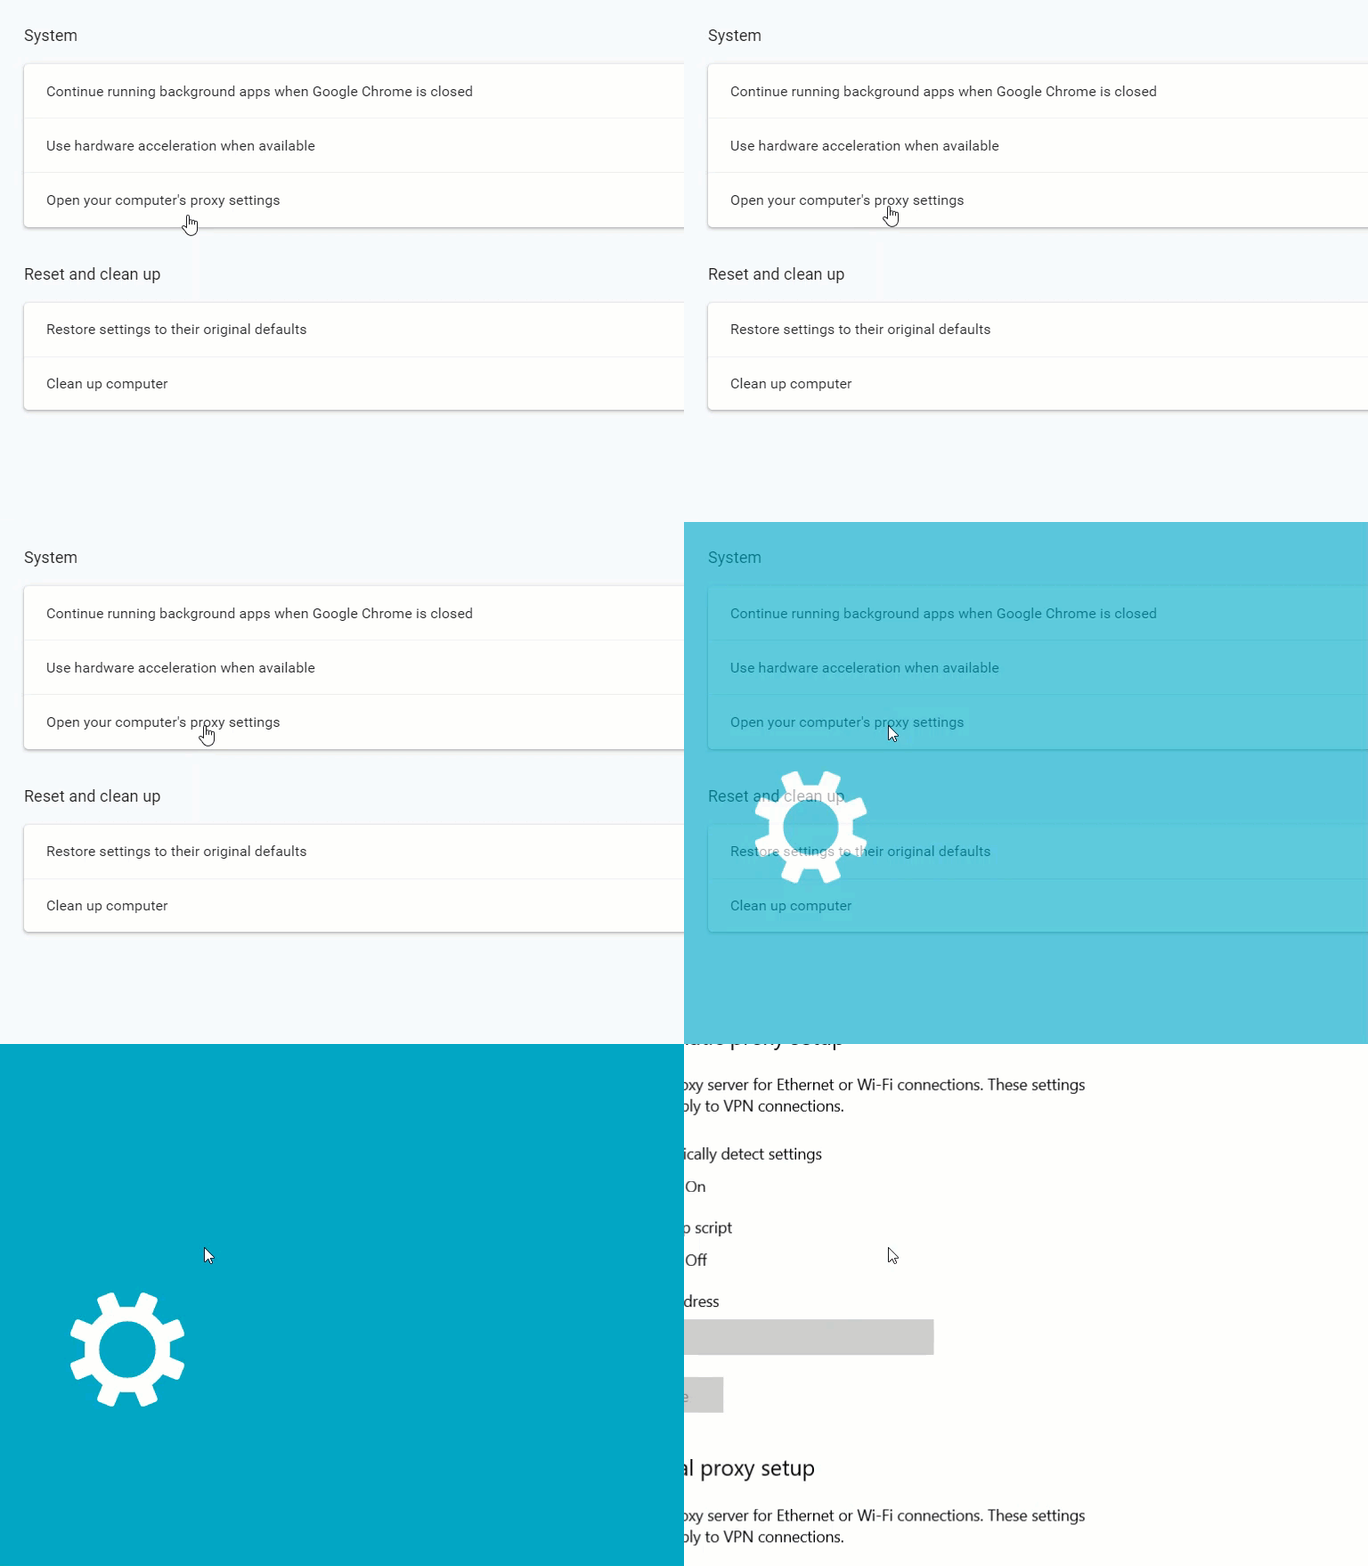
Step 3: Click The Open Computers Proxy Settings
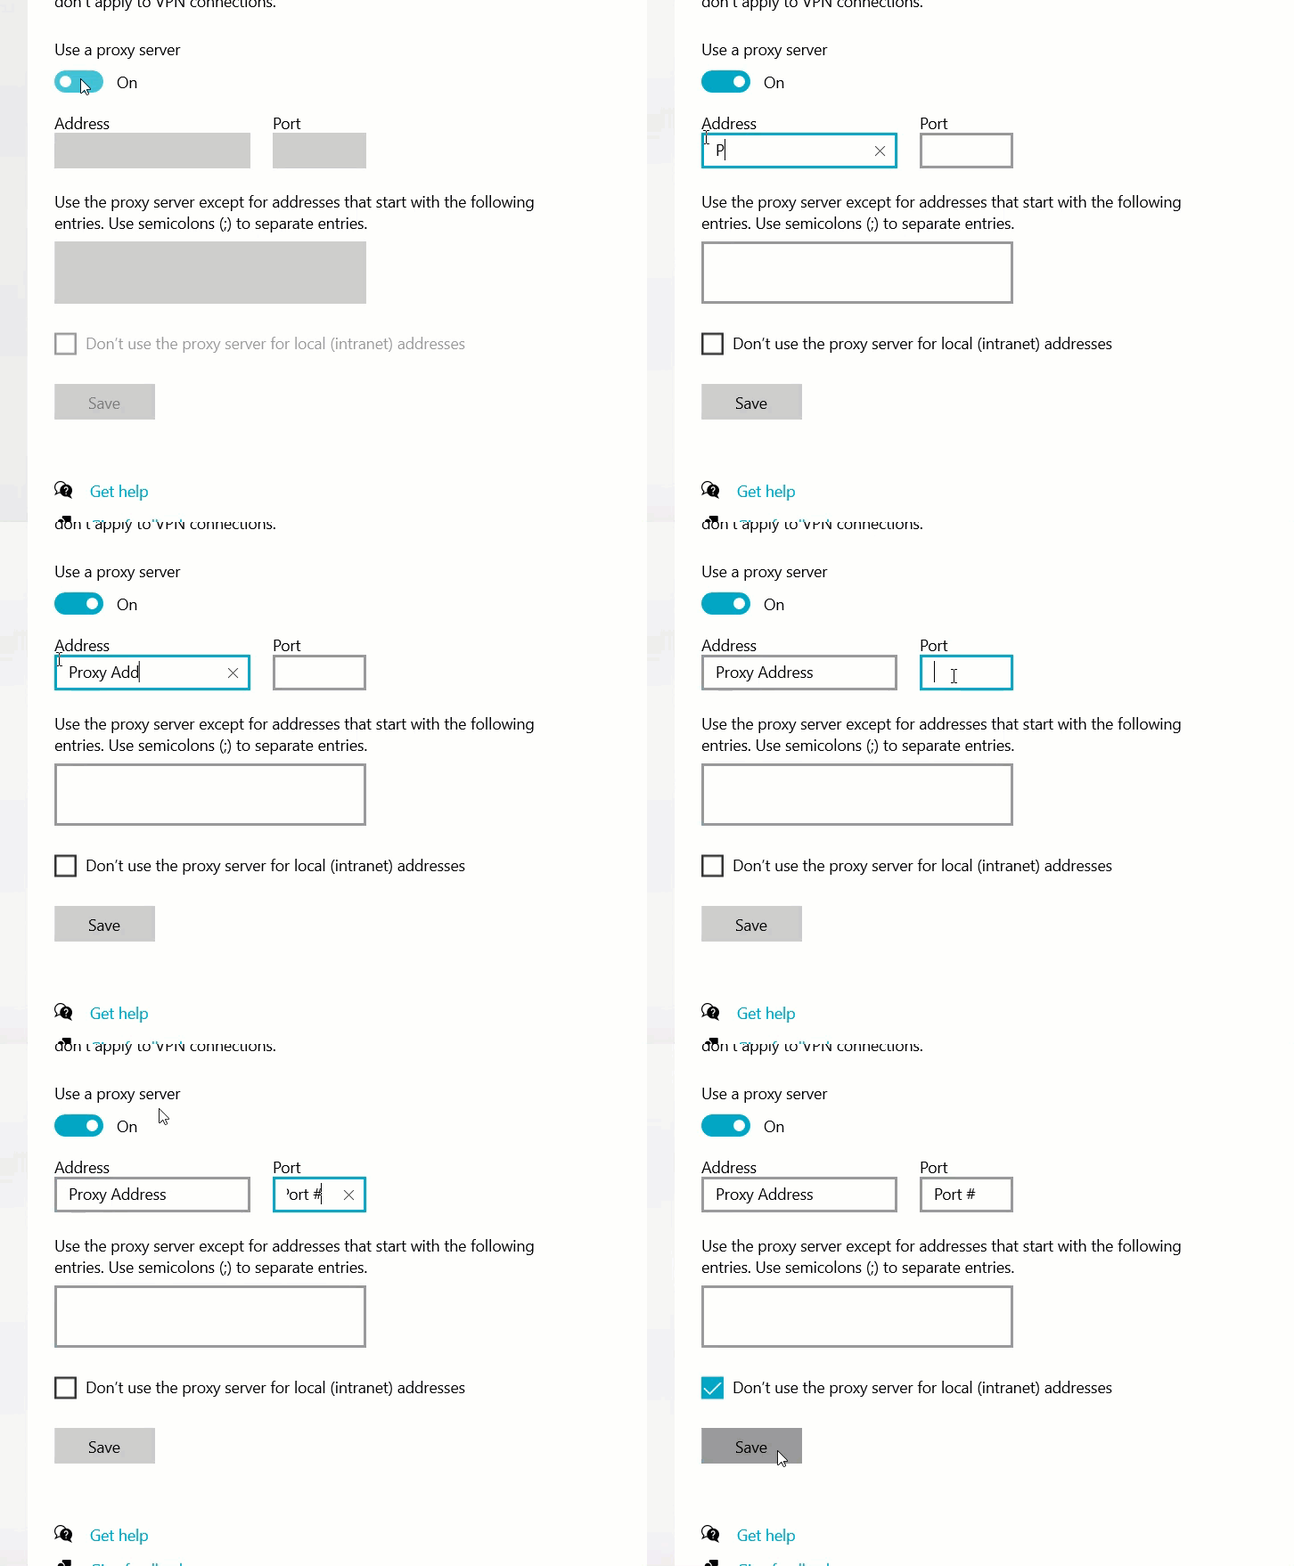
Step 4: Toggle On Proxy And Input Settings
Using A Proxy Manager To Set Up Your Chrome Proxies
Chrome proxy settings by default allow you to use one connection at a time. Maybe for your use case, you would like to change locations without rearranging the settings each time. A proxy manager extension for Chrome can help facilitate this.
At this time, we recommend FoxyProxy.
ProxyEmpire integrates with this extension, and it can be used on other browsers as well. It enables you to set up multiple proxy connections within the extension and with a couple of clicks rotate to a new location. Some also find it to be easier to use than the standard Chrome proxy settings page.
Fix The Unable To Connect To Proxy Error
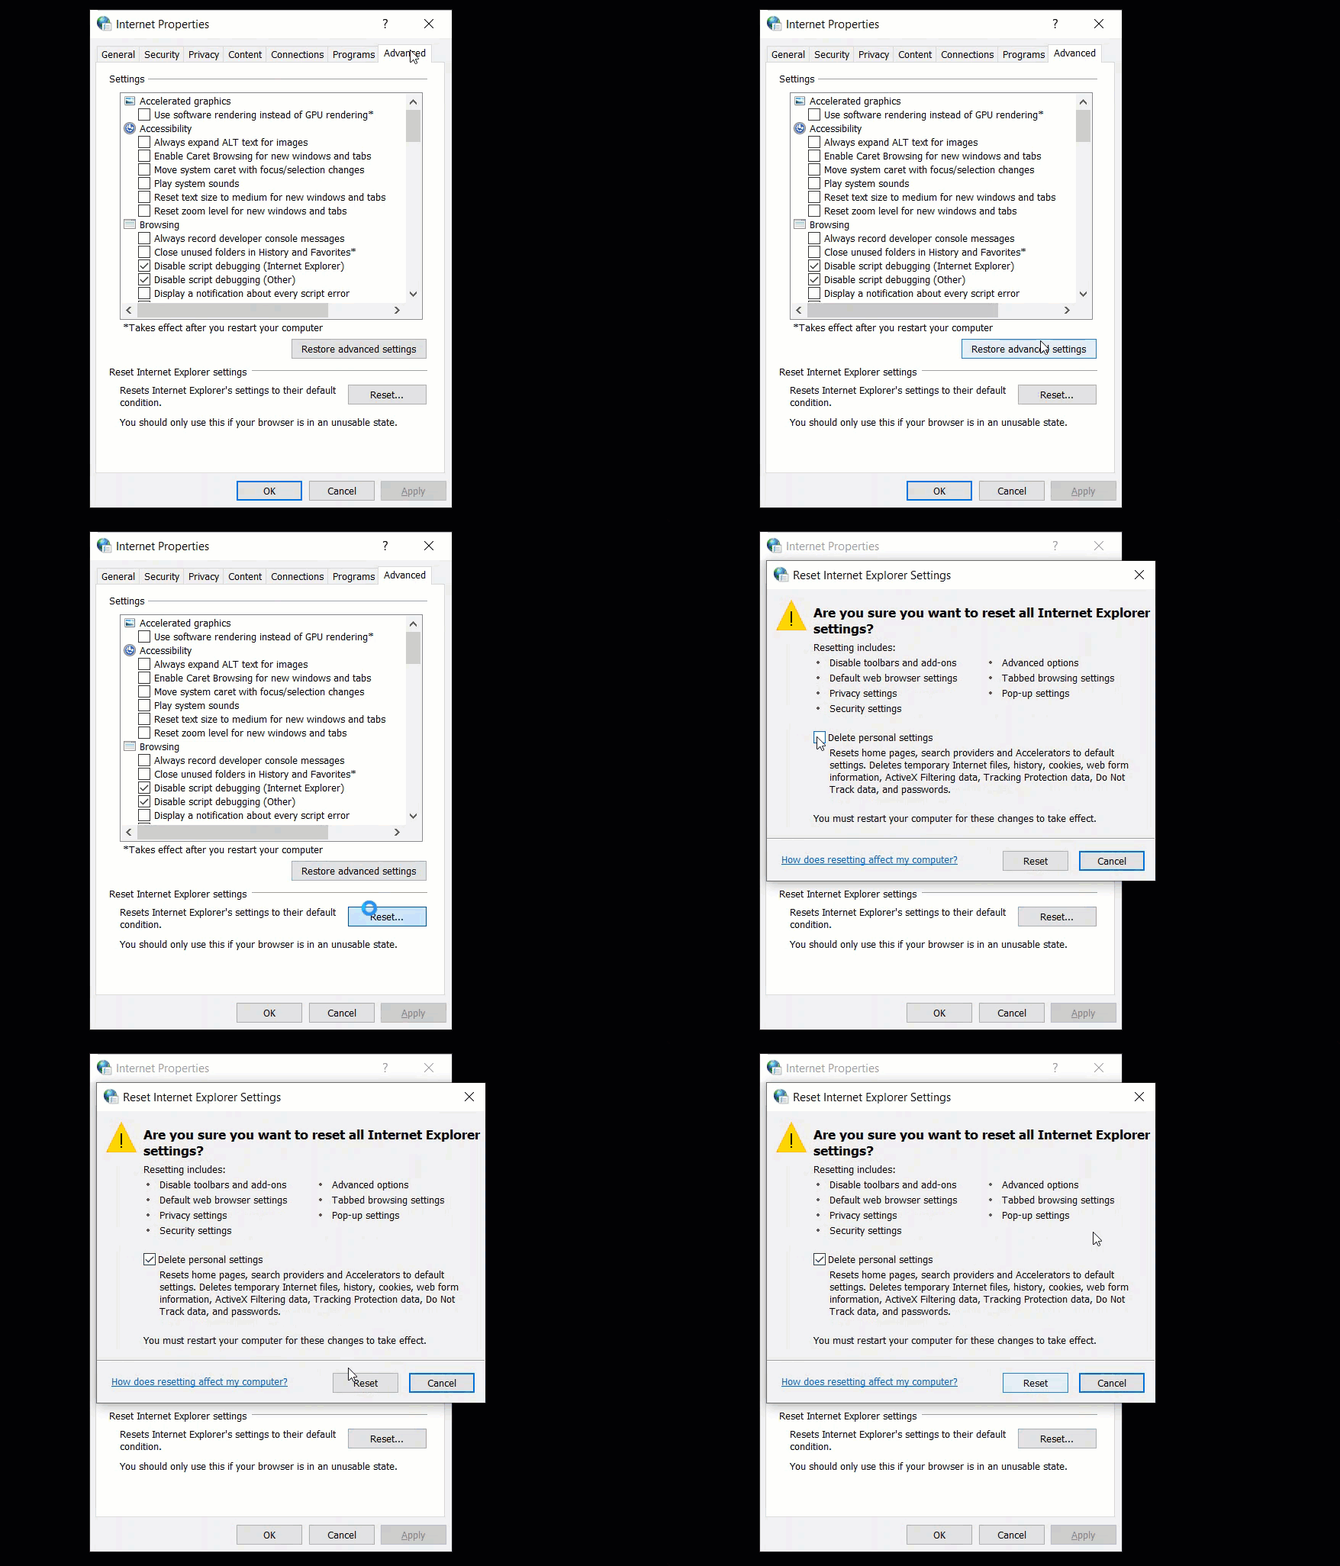
One of the most common errors that you can receive from Chrome as you’re unable to connect to the proxy. there’s two common ways to solve this issue in a couple of seconds. The first thing we’re going to do is reset your Internet settings.
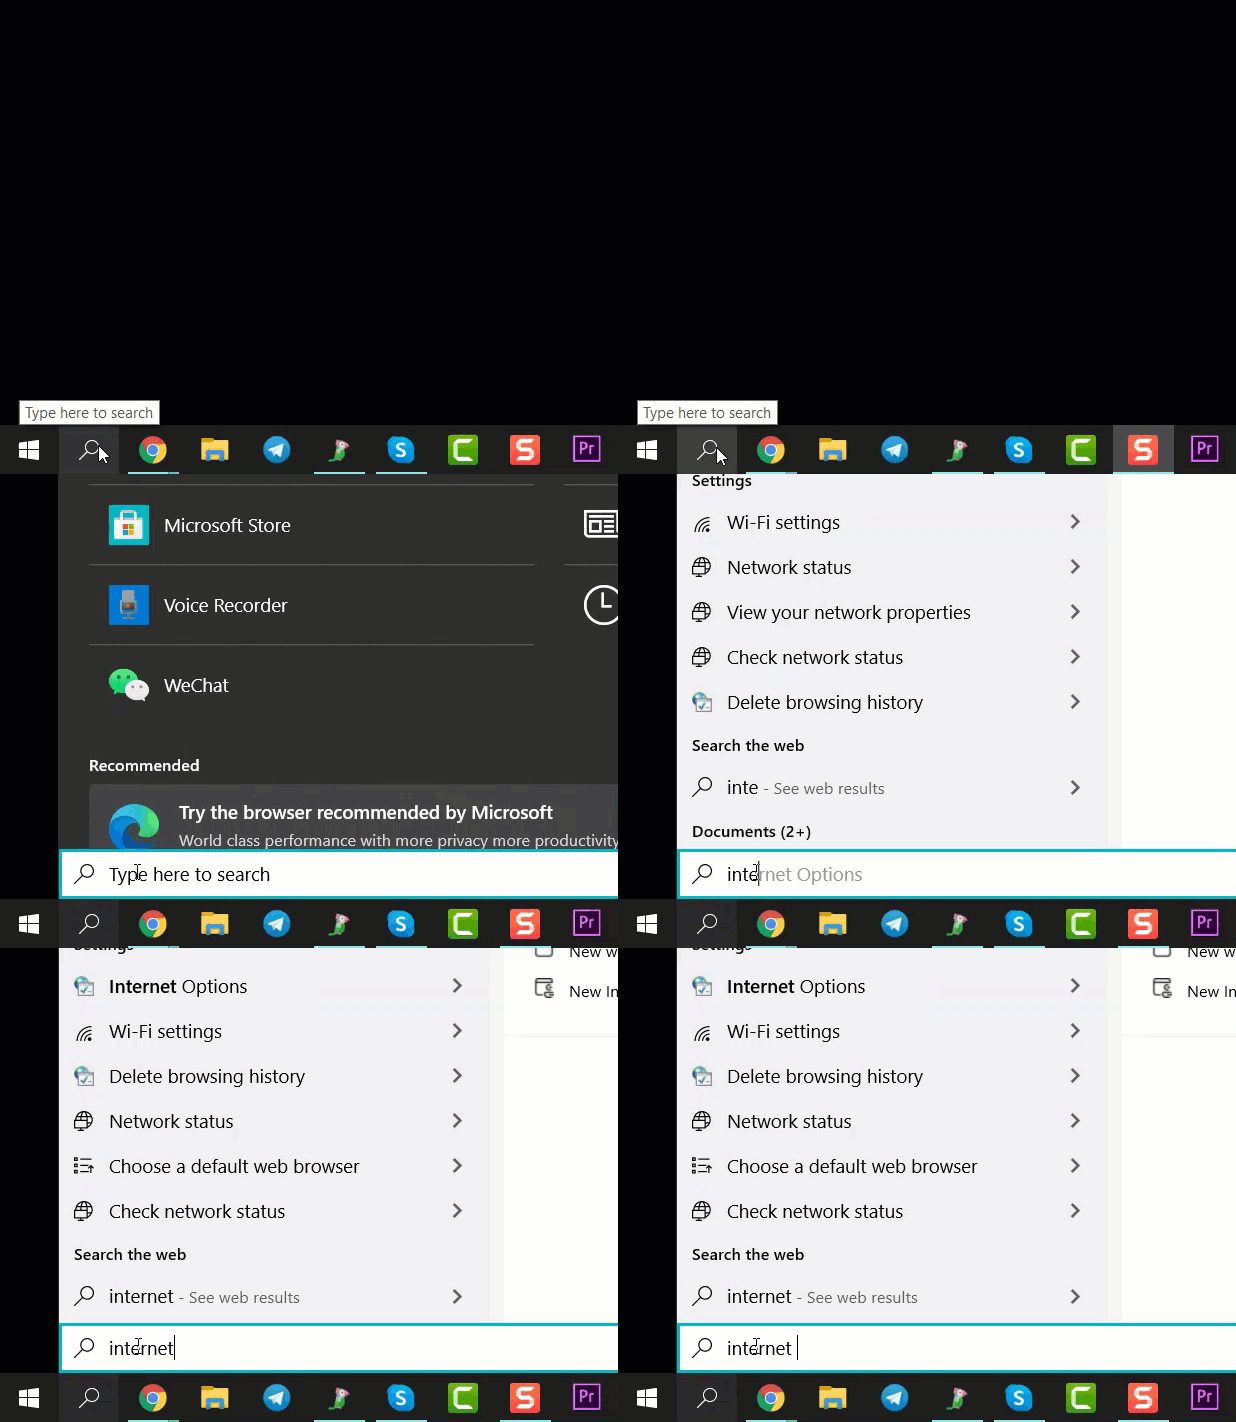
Step 1: Find Internet Option On Your Device
Step 2: Tick The Delete Personal Settings Box And Reset
Testing your proxy is simple and can be done by going to a common reverse IP search tool such as MX TOOLBOX.
Thank you for choosing ProxyEmpire as your trusted proxy partner. If you have any questions we are never far away with our live chat support located in the bottom right hand corner of your screen and are always pleased to help are valuable clients.
TL;DR
Chrome has a built-in way to configure proxy settings for privacy and security. Proxies mask your IP address so your identity and location are hidden while browsing.
Without a proxy, your IP reveals your exact location. Ad companies use this for targeted ads. A proxy filters your traffic so sites see the proxy IP instead of your real one.
Standard datacenter proxies can be detected and limited in location options. Residential and mobile proxies are more anonymous by using real IPs.
To set a proxy in Chrome:
- Open settings via the hamburger menu.
- Go to Advanced > System.
- Open your computer’s proxy settings.
- Enable the proxy and enter details.
This only works for Chrome. To switch IPs easily, use a proxy manager extension like FoxyProxy which integrates with ProxyEmpire.
Common issues include connection errors. To fix:
- Open Internet Options
- Select “Delete personal settings” and reset.
You can test if your proxy is working by looking up the external IP on a site like MXTOOLBOX.
For reliable residential and mobile proxies, ProxyEmpire offers advanced targeting and filters. Proxies keep your web scraping and data gathering anonymous. Support is available through live chat.


