Last Word
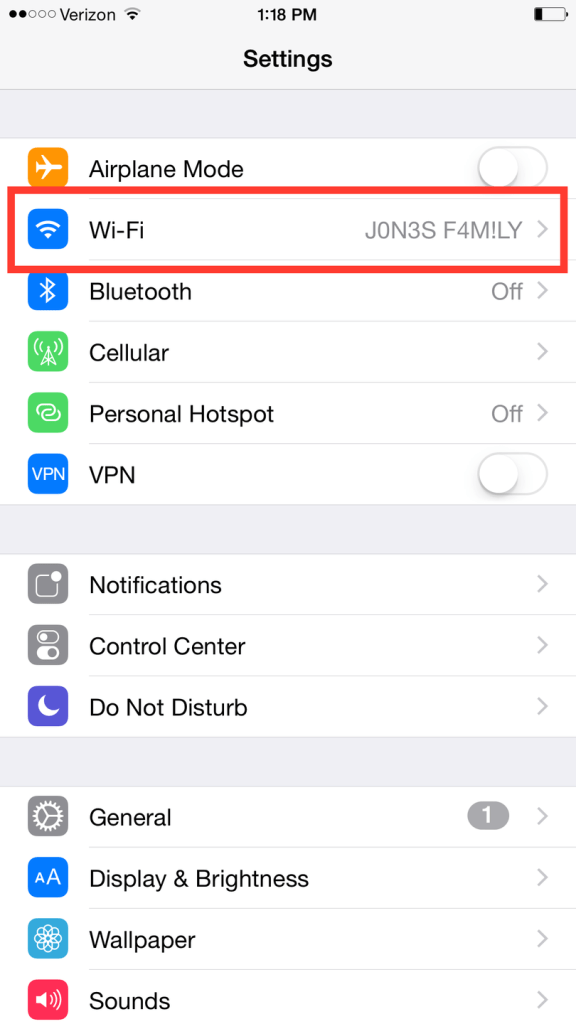
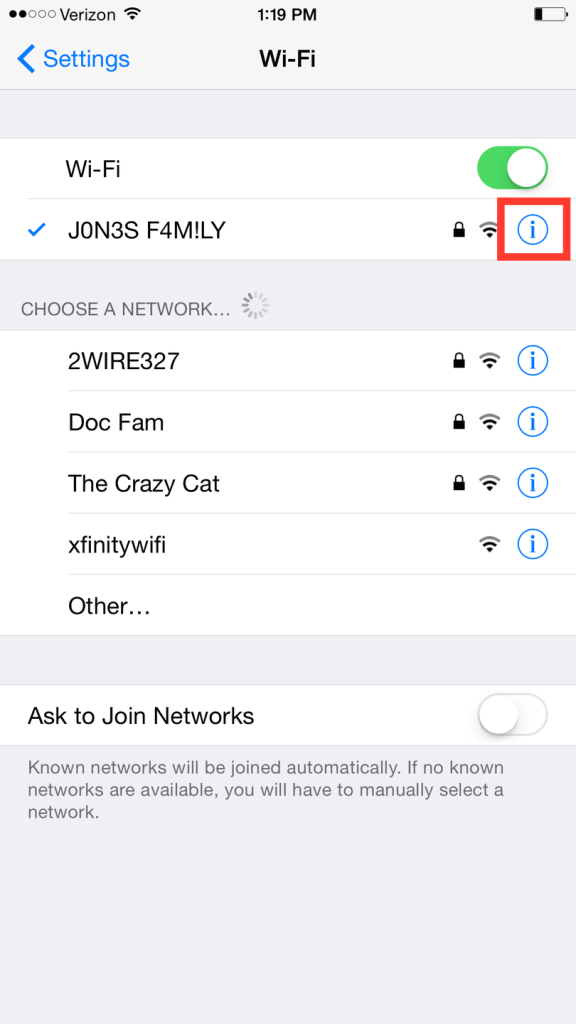
This article provides a simple, step-by-step guide on setting up a proxy on an iPhone using residential or mobile proxy solutions from ProxyEmpire. First, open the iPhone settings and go to WiFi options. Ensure you’re connected to a WiFi network and access the network settings to use a proxy.
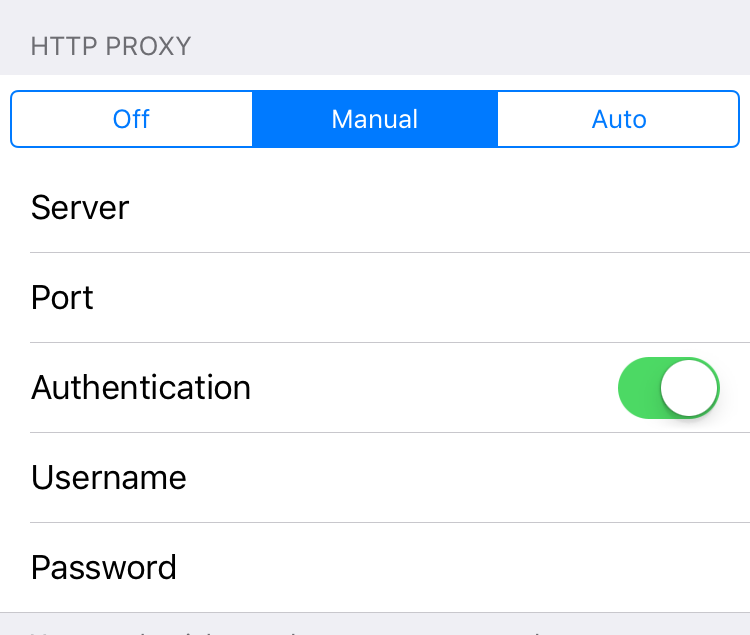
Scroll down to the ‘HTTP Proxy’ section, choose ‘Manual’ and input the proxy details provided by ProxyEmpire – make sure you use the HTTP protocol with an iPhone device. Enable ‘Authentication’ and enter the relevant username and password. Remember, if you change location, the authentication will change too within the proxy manager of your account.
And there you have it – your iPhone is now set up to use a residential or mobile proxy! Generally, all of your applications should use this proxy. You can confirm this by using Safari to view mobile websites. By following these instructions, iPhone proxies can be set up without additional applications, making the iPhone proxy setup process smooth and easy.
Current Statistics (2024)
As of 2024, the use of proxies on iPhones has seen significant growth. Here’s a breakdown of the key statistics:
| Metric | Percentage |
| iPhone users utilizing proxies | 28% |
| Users citing privacy as primary reason | 65% |
| Users employing proxies for geo-restriction bypass | 42% |
| Corporate iPhone users with mandated proxy use | 37% |
| Users reporting improved browsing speeds with proxies | 31% |
Latest Trends in iPhone Proxy Usage (2024)
Several trends have emerged in the realm of iPhone proxy usage:
- Increased adoption of VPN-proxy hybrids: Many users are opting for solutions that combine the features of VPNs and proxies for enhanced security and flexibility.
- Rise in mobile-specific proxy protocols: New protocols designed specifically for mobile devices have been developed, offering better performance and security on iPhones.
- Integration with native iOS features: Apple has introduced more seamless ways to configure and manage proxy settings within the iOS ecosystem.
- Growing emphasis on encrypted proxies: Users are increasingly favoring proxies that offer end-to-end encryption for all traffic.
- Surge in proxy usage for streaming services: More iPhone users are employing proxies to access geo-restricted content on streaming platforms.
Projections for 2025
Looking ahead to 2025, several developments are anticipated in the iPhone proxy landscape:
- Automated proxy switching: iOS is expected to introduce features that automatically switch between different proxy servers based on network conditions and user preferences.
- AI-powered proxy selection: Machine learning algorithms will likely be employed to select the most optimal proxy server for each specific use case.
- Increased integration with cloud services: Proxy settings are projected to be more tightly integrated with cloud storage and synchronization services.
- Enhanced support for IoT devices: iPhones are expected to act as proxy hubs for other connected devices in the user’s ecosystem.
- Blockchain-based proxy networks: Decentralized proxy networks utilizing blockchain technology are anticipated to gain traction among iPhone users.
Projected Statistics for 2025
| Metric | Projected Percentage |
| iPhone users utilizing proxies | 35% |
| Users employing AI-assisted proxy selection | 40% |
| Corporate iPhone users with mandated proxy use | 45% |
| Users of blockchain-based proxy networks | 15% |
| iPhones serving as proxy hubs for IoT devices | 20% |
As we move towards 2025, the landscape of proxy usage on iPhones is set to evolve significantly, with a greater emphasis on automation, integration, and advanced security features. These developments will likely make proxy usage more accessible and effective for a broader range of iPhone users.
FAQ:
What is a proxy server on an iPhone?
A proxy server on an iPhone acts as an intermediary between your device and the internet. It routes your internet traffic through a different server, potentially masking your IP address and providing additional privacy or security benefits.
Why would I want to use a proxy on my iPhone?
There are several reasons to use a proxy on your iPhone:
- Enhance privacy by masking your IP address
- Bypass geographic restrictions on content
- Access school or work networks that require a proxy
- Improve security by filtering malicious content
- Potentially speed up internet browsing in some cases
Can I set up a proxy on my iPhone’s cellular data connection?
No, iPhones don’t support proxy connections over mobile data. You can only set up and use a proxy when connected to a Wi-Fi network.
What types of proxies can I use on my iPhone?
iPhones are designed to work with HTTP proxies. SOCKS5 proxies are not natively supported on iOS devices.
How do I manually configure a proxy on my iPhone?
To manually set up a proxy:
- Open Settings
- Tap Wi-Fi
- Tap the info icon (i) next to your connected network
- Scroll down to “HTTP Proxy” and tap “Configure Proxy”
- Select “Manual”
- Enter the proxy server address and port
- If required, enable Authentication and enter your username and password
- Tap “Save”
Can I automatically configure a proxy on my iPhone?
Yes, if you have a proxy auto-configuration (PAC) script URL:
- Follow steps 1-4 from the manual configuration
- Select “Automatic”
- Enter the PAC script URL in the provided field
- Tap “Save”
Will the proxy settings apply to all apps on my iPhone?
The proxy settings will apply to your device’s browser and most apps that use your iPhone’s default network settings. However, some apps may bypass these settings.
How can I test if my proxy is working?
You can check if your proxy is working by searching for “What is my IP address” in your browser. If the IP address shown is different from your usual one, the proxy is likely working.
Can I use a free proxy on my iPhone?
While free proxies exist, they’re generally not recommended due to potential security risks, slower speeds, and unreliability. It’s safer to use a reputable paid proxy service.
How do I turn off the proxy on my iPhone?
To disable the proxy:
- Go to Settings > Wi-Fi
- Tap the info icon next to your connected network
- Scroll to “HTTP Proxy” and tap “Configure Proxy”
- Select “Off”
- Tap “Save”
Do I need to set up a proxy for each Wi-Fi network I use?
Yes, proxy settings are specific to each Wi-Fi network. You’ll need to configure the proxy separately for each network you want to use it with.
