Ghost Browser lets you run several logged-in accounts in one window: each Identity keeps its own cookies, and tabs from different Identities sit side by side. With Ghost Proxy Control you can also give each tab, Identity or Workspace its own proxy. This guide explains Ghost Browser proxy settings with ProxyEmpire: adding proxies to Ghost Proxy Control one by one or from a CSV file, assigning them at the right level, testing them, and choosing between residential, mobile and static residential proxies.
The short version
In Ghost Browser, open the Ghost Proxy Control extension, choose Add/Edit Proxies, then Add a Single Proxy, and enter host v2.proxyempire.io, port 5000 and your ProxyEmpire username and password. Then click the extension icon, choose the tab, Identity or Workspace, pick the proxy and reload. Give each permanent Identity its own sticky session. Ghost Proxy Control is part of Ghost Browser’s Pro plan.
How Ghost Browser Uses Proxies
Tabs, Identities and WorkspacesGhost Browser is a Chromium-based browser for people who work in many accounts at once, such as social media managers, agencies and marketplace sellers. Instead of separate profile windows, it separates accounts by Identity. A permanent Identity has its own cookie jar that is saved even after you close all its tabs, so the account stays logged in. Temporary Identities are for one-off sessions, and their cookies are thrown away when the tabs close. Ghost Browser can also give each Identity a new fingerprint when you reset it.
Keeping cookies apart is only half of it. If every Identity uses the same internet connection, a platform sees all those accounts coming from one IP address and can link them. That’s what Ghost Proxy Control is for: it lets you assign a different proxy at three levels.
- Tab: a proxy for one tab only, which overrides everything else.
- Identity: a proxy for every tab in that Identity, which overrides the Workspace proxy.
- Workspace: a default proxy for the whole Workspace.
For account work, the Identity level is the one that matters: each permanent Identity gets its own sticky session, so every tab you open for that account uses the same IP.
What you need
- Ghost Browser with the Pro plan, which includes Ghost Proxy Control. The extension doesn’t include proxies; you bring your own.
- A ProxyEmpire account with bandwidth. The $1.97 trial includes 100 MB of residential and 50 MB of mobile bandwidth.
- Your permanent Identities set up, one per account.
Step 1: Get Your ProxyEmpire Proxy Details
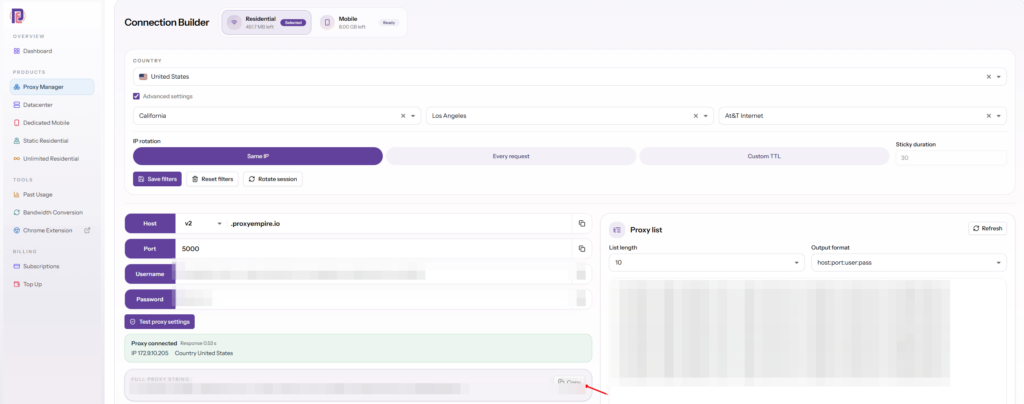
One sticky session per IdentityIn the ProxyEmpire dashboard, open the Proxy Manager to reach the Connection Builder. Choose Residential or Mobile and a country, and use the advanced settings for a region, city or ISP (carrier on mobile). Residential and mobile also support ZIP, ASN and OS fingerprint targeting at no extra cost. Static residential and datacenter proxies are targeted by country.
Set the IP rotation:
- Same IP is a sticky session with no fixed time limit; the IP stays until you rotate it or the device behind it goes offline. Use it for every Identity with a logged-in account.
- Every request gives a new IP each time, which suits a research tab, not an account.
- Custom TTL rotates on a timer you set, up to two hours.
The Connection Builder shows host v2.proxyempire.io, port 5000, your username and password, a Test proxy settings button and a full proxy string. Your targeting and session are part of the username, so each sticky session you create for an Identity is simply a different username with the same host, port and password. ProxyEmpire supports HTTP, HTTPS and SOCKS5; HTTP and SOCKS5 use the same details, and ProxyEmpire authenticates by username and password.
Step 2: Add Proxies to Ghost Proxy Control
One at a time- Open the extensionClick the Ghost Proxy Control icon in the extension tray.
- Manage proxiesChoose Add/Edit Proxies.
- Add a single proxyClick Add a Single Proxy.
- Enter the detailsEnter the host and port, then the ProxyEmpire username and password, and give the proxy a name.
- SaveClick Add Proxy. It now appears in Ghost Proxy Control’s list.
Name each proxy after the Identity it’s for, such as “Store US 1” or “Client B Instagram”, rather than after its city. When a sticky IP ever needs replacing, you’ll know exactly which entry to update. A short, consistent naming scheme also makes the Ghost Proxy Control menu much faster to use once the list grows past a dozen entries.
Ghost Proxy Control handles HTTP and HTTPS proxies in host and port form with optional credentials, and SOCKS5 proxies written with a socks5:// prefix. With ProxyEmpire, plain HTTP is the simplest: it works for all websites, including HTTPS ones, because the browser tunnels encrypted traffic through the proxy.
Step 3: Assign Proxies to Tabs and Identities
Pick the level, pick the proxy, reloadTo assign a proxy, click the Ghost Proxy Control icon, choose whether it applies to the active tab, the Identity or the Workspace, select the proxy and click Reload. For a permanent Identity you can also open the Identity Manager and use the Set Proxy link under that Identity, then pick the proxy from the drop-down. Ghost Browser’s documentation notes that tying a proxy to an Identity keeps that account’s browsing history consistent.
Remember the order of precedence: a tab proxy beats an Identity proxy, which beats a Workspace proxy. If an account tab shows an unexpected IP, check whether a tab-level proxy is overriding the Identity’s.
To test, open a fresh tab in the Identity and search for “what is my IP”, or use any IP-check site. The IP and country should match your ProxyEmpire targeting. A neighbouring town is normal, since IP-location databases often disagree about the exact city.
Check the rest of the identity too: timezone, language and WebRTC should match the proxy’s location rather than your computer’s. ProxyEmpire carries TCP traffic only, not UDP, so make sure WebRTC doesn’t reveal your real IP.
Importing Ghost Browser Proxies in Bulk
A CSV template for many IdentitiesWith many Identities, typing proxies one by one gets slow. Ghost Proxy Control imports them from a CSV file:
- Open Ghost Proxy Control’s settings and click Add Bulk Proxies.
- Click Export Proxy List to download the pre-formatted CSV template.
- Fill in one proxy per row. Don’t change the column names.
- Click Import Proxy List and choose the updated file.
host               port   username                  password
v2.proxyempire.io  5000   username-for-session-1    password
v2.proxyempire.io  5000   username-for-session-2    password
v2.proxyempire.io  5000   username-for-session-3    password
The usernames are placeholders. The Proxy list panel in ProxyEmpire’s Connection Builder generates real ones: set the list length, choose the host:port:user:pass output format and copy, then split each line into the template’s columns. Each row is its own sticky session, so each Identity gets its own IP.
Keep the CSV as your record of which session belongs to which Identity. When a sticky IP drops, start a new session in the same city and update that one row.
Which ProxyEmpire Proxy to Use with Ghost Browser
Match the IP to the account| Rotating residential | Rotating mobile | Static residential | |
|---|---|---|---|
| IP source | Home broadband | 4G carrier networks | Residential ISP ranges |
| In Ghost Browser | One sticky session per Identity | One sticky session per Identity | One IP per Identity |
| Targeting | Country to ZIP, ISP, ASN | Country to ZIP, carrier, ASN | Country |
| Best for | Stores, client accounts, most web accounts | Social media and app-first platforms | Accounts that must keep one IP |
| Price | $3.50/GB, down to $1.50/GB | $4.50/GB, down to $2.00/GB | $3.50 for one IP, down to $2.00/IP a month |
Rotating residential on a sticky session covers most Identities. Mobile IPs, shared by many real subscribers on carrier networks, are safer for strict social platforms. Static residential, sold in 24 countries, suits accounts that should always log in from the same address. All three share one ProxyEmpire balance, and unused bandwidth rolls over.
Habits that keep accounts apart
- One session per Identity, never shared between two accounts on the same platform.
- Stable location: the same country and, ideally, the same city at every login.
- Replace locally: if a sticky IP drops, start a new session in the same city.
- Use Temporary Identities for quick checks, so they don’t touch your saved accounts.
Troubleshooting Ghost Browser Proxy Settings
Common problems and fixes| Problem | Likely cause and fix |
|---|---|
| Tab shows the wrong IP | A tab-level proxy is overriding the Identity’s. Clear the tab proxy, or assign the right one and reload. |
| Proxy doesn’t connect | Usually a typo or an old password. Copy the details from the Connection Builder again and re-enter them. |
| CSV import fails | A column name was changed. Export a fresh template and paste your values into it unchanged. |
| IP changed mid-session | The username is set to Every request, or the device behind the sticky IP went offline. Use Same IP and start a new session in the same city. |
| Stopped working | Check your bandwidth balance and whether targeting changed, which changes the username. |
| One site won’t load | Some site categories are restricted on ProxyEmpire by default, including banks, payment processors such as PayPal and Stripe, and crypto exchanges, and only ports 80 and 443 are open. Access can be reviewed after KYC and a use-case explanation to support. |
ProxyEmpire support is available 24/7 through live chat in the dashboard. Get Ghost Browser from its official site. If you need a full anti-detect browser with separate fingerprints per profile, see our Multilogin proxy guide.
Ghost Browser Proxy FAQ
Straight answersHow do I set up a proxy in Ghost Browser?
Open Ghost Proxy Control, choose Add/Edit Proxies, then Add a Single Proxy, and enter the host, port, username and password. Then click the extension icon, choose the tab, Identity or Workspace, select the proxy and reload.
What is Ghost Proxy Control?
It’s Ghost Browser’s proxy extension, included in the Pro plan, that lets you assign a different proxy to each tab, Identity or Workspace. Proxies aren’t included; you add your own.
Can each Ghost Browser Identity have its own proxy?
Yes. Use the Set Proxy link under the Identity in the Identity Manager, or assign it from the Ghost Proxy Control menu. Every tab in that Identity then uses that proxy unless a tab-level proxy overrides it.
How do I import many proxies into Ghost Browser?
In Ghost Proxy Control, click Add Bulk Proxies, export the CSV template, fill in one proxy per row without changing the column names, and import it with Import Proxy List.
What is the best proxy for Ghost Browser?
Rotating residential proxies with one sticky session per Identity suit most accounts. Use rotating mobile proxies for social media and app-first platforms, and static residential proxies for accounts that must keep one IP.
Does Ghost Browser support SOCKS5 proxies?
Yes. Ghost Proxy Control accepts HTTP, HTTPS and SOCKS5 proxies. ProxyEmpire supports HTTP, HTTPS and SOCKS5; HTTP and SOCKS5 use the same host, port, username and password.
Why does a tab ignore my Identity’s proxy?
A proxy assigned to the tab overrides the Identity’s proxy, and an Identity proxy overrides the Workspace’s. Remove or change the tab proxy.
Can I try ProxyEmpire with Ghost Browser first?
Yes. The $1.97 trial includes 100 MB of residential and 50 MB of mobile bandwidth, and unused trial bandwidth doesn’t expire.
References
Primary documentation- Ghost Browser Support — Ghost Proxy Control. support.ghostbrowser.com/article/365-ghost-proxy-control
- Ghost Browser Support — Identities. support.ghostbrowser.com/article/320-identities
- Ghost Browser Support — Temporary Identities. support.ghostbrowser.com/article/319-sessions
Give every Ghost Browser Identity its own real IP
Residential, 4G mobile and static residential proxies with city, ZIP, ISP and carrier targeting included, a sticky session for each Identity, bandwidth that rolls over and 24/7 support from real people. Try it for $1.97.